Please Note: Because all bowlers have different positive axis points (PAP) your layouts may not have the same appearance as the illustrations. Also the layouts are for right-handed players. Remember to flip or rotate to produce "mirror-image" for left-handed players.
900 Global Drilling Layouts
- Step 1. Identify your Bowling style. In order to accurately determine a drilling pattern and final ball surface, you must first identify your personal bowling characteristics; these three key factors must be determined.
- 1. Bowlers Ball Speed
- 2. Bowler Rev Rate
- 3. Bowlers Axis Angle of Rotation
- Chose the number below in each category that best describes your bowling style.
- Step 1:
- Ball Speed 1 = slower, 2 = average, 3 = faster
- Ball rev Rate (RMPs) 1 = cranker (18 or more), 2 = tweener (13-17), 3 = stroker (12 or less)
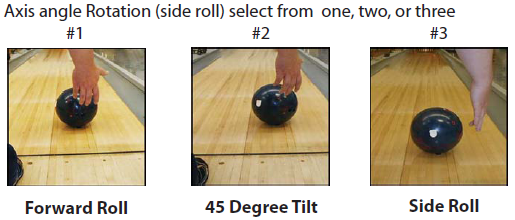
- Axis angle Rotation (side roll) select from one, two, or three
- Step 2: Total your numbers up from ball speed, rev rate, and axis rotation. Use that number to select your drilling pattern.
- Step 3: Layout must be based on your Positive Axis Point, illustrations are all based off a 5-1/2 over PAP.
- Step 3: Choose your lane condition.
- Step 4: Adjust surface.
Layout 1
Layout 3
Layout 4

Layout 5

Layout 6
Layout 7

Layout 8
Layout 9
Layout 10

Dynamo Drilling Instructions

Layout 1 - Label for Short Pins

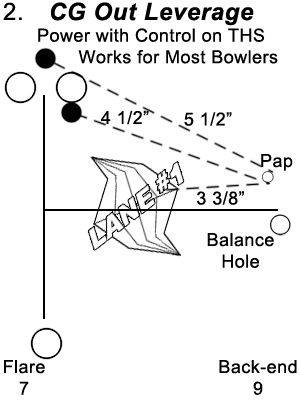
Layout 2 - Power with Control on THS
Layout 3 - Stacked - For medium to Lower Revs

Layout 4 - Pin in Palm - For Lower Tracks, Early Roll, and Wet/Dry
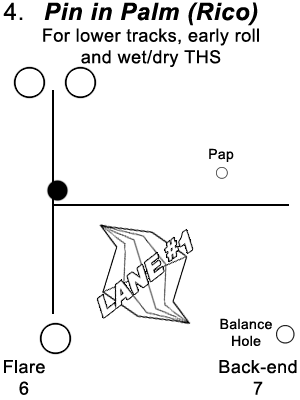 Great for Wet/Dry Lanes with Drier Backends!
- Produces less flare for increased stability and control!
- Creates less entry angle and a more predictable ball path
- Works well on 'Wet/Dry' both front-to-back side-to-side - lane conditions
- Good for Higher Rev Players
Layout 5 - Pro Pin High RG - Length for high Revs and Dry Heads

Chainsaw Drilling Instructions

Layout 1 - Label 1:30 Pin
Layout 2 - Negative Pin Label
Layout 4 - CG Out Leverage
Layout 6 - Pro Pin CG Strong
Master Drilling
Layout 1
5-Ã?Æ?�Ã?¯Ã?¿Ã?½Ã?Æ?Ã?¯Ã?â??Ã?¿Ã?â??Ã?½Ã?Æ?�Ã?¯Ã?¿Ã?½Ã?Æ?�Ã?â??Ã?¾" Pin to PAP |
Layout 2
4-Ã?Æ?�Ã?¯Ã?¿Ã?½Ã?Æ?Ã?¯Ã?â??Ã?¿Ã?â??Ã?½Ã?Æ?�Ã?¯Ã?¿Ã?½Ã?Æ?�Ã?â??Ã?¼" Pin to PAP |
Layout 3
2-Ã?Æ?�Ã?¯Ã?¿Ã?½Ã?Æ?Ã?¯Ã?â??Ã?¿Ã?â??Ã?½Ã?Æ?�Ã?¯Ã?¿Ã?½Ã?Æ?�Ã?â??Ã?¼" Pin to PAP |
Layout 4
4-Ã?Æ?�Ã?¯Ã?¿Ã?½Ã?Æ?Ã?¯Ã?â??Ã?¿Ã?â??Ã?½Ã?Æ?�Ã?¯Ã?¿Ã?½Ã?Æ?�Ã?â??Ã?½" Pin to PAP, For Full Rollers |
Note: For reaction adjustments, consult the Ball Surface Reaction Guide. Be sure to check for excess side weight and finger/thumb weight, as a balance hole may be necessary for any of these layouts. If one is required, draw a line from the center of the grip through the CG and extend to the PAL. This will be the location of the balance hole.

Layout 1
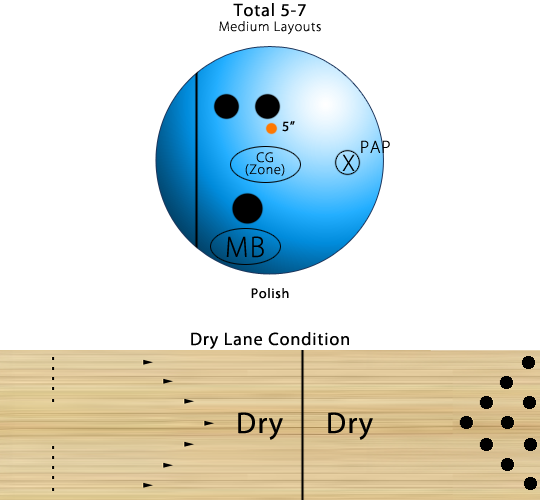
- With this layout, we place the pin 5-Ã?Æ?�Ã?¯Ã?¿Ã?½Ã?Æ?Ã?¯Ã?â??Ã?¿Ã?â??Ã?½Ã?Æ?�Ã?¯Ã?¿Ã?½Ã?Æ?�Ã?â??Ã?¾" from the PAP, above the finger holes, to produce length on drier conditions.
- Next we select a mass bias, MCÃ?Æ?�Ã?¯Ã?¿Ã?½Ã?Æ?Ã?¯Ã?â??Ã?¿Ã?â??Ã?½Ã?Æ?�Ã?¯Ã?¿Ã?½Ã?Æ?�Ã?â??Ã?², position suitable for our desired breakpoint shape.
- (A) Mass Bias in the ball track - designed to prodce a late and smooth breakpoint
- (B) Mass Bias in the Strong Position - This will produce an earlier and sharper breakpoint than position A. - Good for extreme entry angle!
- (C) Mass Bias on the PAL - produces the earliest breakpoint of the three positions while providing a controllable and "readable" backend. - Works great on heavy oil patterns!
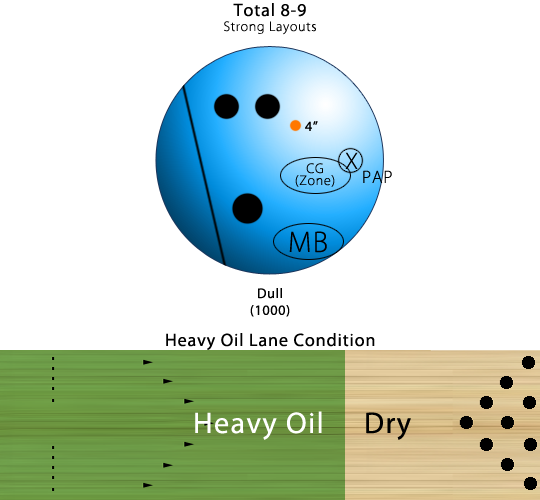
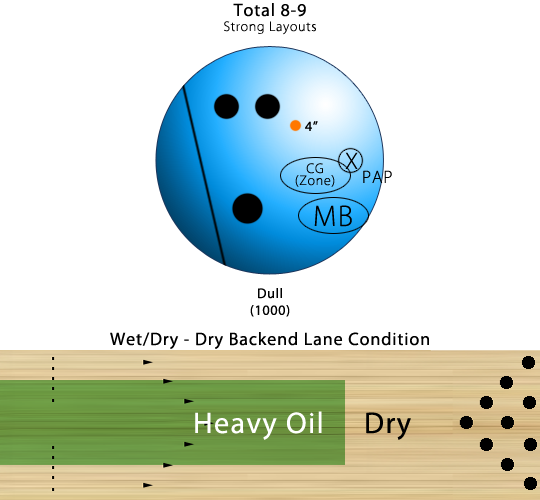
Layout 2
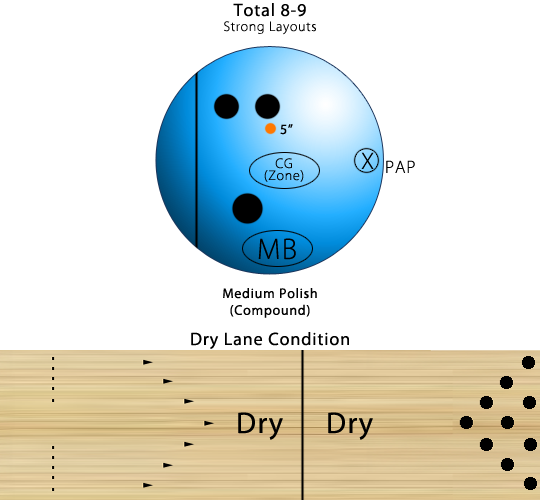
- With this layout, we place the pin 4-Ã?Æ?�Ã?¯Ã?¿Ã?½Ã?Æ?Ã?¯Ã?â??Ã?¿Ã?â??Ã?½Ã?Æ?�Ã?¯Ã?¿Ã?½Ã?Æ?�Ã?â??Ã?¼" from the PAP. This position will produce medium to high flare, great for players trying to "open up" on a medium to heavy oil lane condition.
- For bowlers with medium to high rev rates, this in position will often produce the most overall hook throughout the entire lane.
- Now select an MCÃ?Æ?�Ã?¯Ã?¿Ã?½Ã?Æ?Ã?¯Ã?â??Ã?¿Ã?â??Ã?½Ã?Æ?�Ã?¯Ã?¿Ã?½Ã?Æ?�Ã?â??Ã?² position:
- (A) Locate the Mass Bias halfway between the ball track and PAL - designed to produce a sharp breakpoint
- (B) Place the Mass Bias at the PAL for an easier, smoother, breakpoint.
- (C) Place the Mass Bias 2" past the PAL for a very heavy midlane roll on long oil patterns.
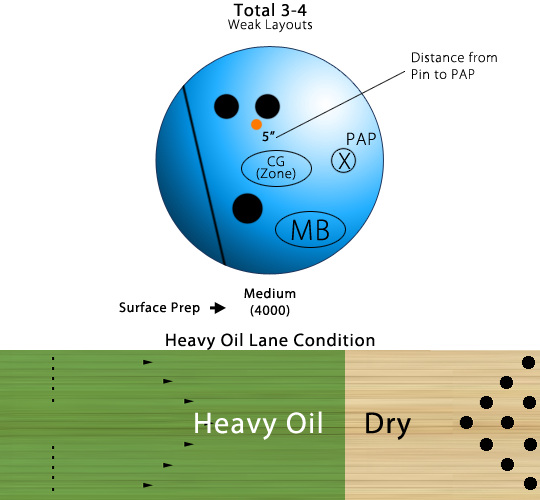
Layout 3
- With this layout, select a ball with a pin 3 - 4Ã?Æ?�Ã?¯Ã?¿Ã?½Ã?Æ?Ã?¯Ã?â??Ã?¿Ã?â??Ã?½Ã?Æ?�Ã?¯Ã?¿Ã?½Ã?Æ?�Ã?â??Ã?½" out from the CG.
- Place the pin 2Ã?Æ?�Ã?¯Ã?¿Ã?½Ã?Æ?Ã?¯Ã?â??Ã?¿Ã?â??Ã?½Ã?Æ?�Ã?¯Ã?¿Ã?½Ã?Æ?�Ã?â??Ã?¼" from the PAP.
- Locate the MCÃ?Æ?�Ã?¯Ã?¿Ã?½Ã?Æ?Ã?¯Ã?â??Ã?¿Ã?â??Ã?½Ã?Æ?�Ã?¯Ã?¿Ã?½Ã?Æ?�Ã?â??Ã?² on the players ball track.
- Weigh the ball to ensure static balance is withing 1oz in both left/right and finger/thumb directions. For this particular layout we will not use a balance hole.
- This layout will produce an early roll, a minimum amount of flare and works well for controlling conditions with dry backends.
Layout 4 - For Full Rollers
- For players who track between the fingers and thumb (full rollers), place the major pin 4-Ã?Æ?�Ã?¯Ã?¿Ã?½Ã?Æ?Ã?¯Ã?â??Ã?¿Ã?â??Ã?½Ã?Æ?�Ã?¯Ã?¿Ã?½Ã?Æ?�Ã?â??Ã?½" from the grip center in the southwest direction.
- If a weight hole is necessary, be sure to locate it 6 Ã?Æ?�Ã?¯Ã?¿Ã?½Ã?Æ?Ã?¯Ã?â??Ã?¿Ã?â??Ã?½Ã?Æ?�Ã?¯Ã?¿Ã?½Ã?Æ?�Ã?â??Ã?¾ from the grip center in the direction of either the major pin or MCÃ?Æ?�Ã?¯Ã?¿Ã?½Ã?Æ?Ã?¯Ã?â??Ã?¿Ã?â??Ã?½Ã?Æ?�Ã?¯Ã?¿Ã?½Ã?Æ?�Ã?â??Ã?² pin.
Basic Drilling Instructions
Layout 1 - Label Drilling
- This layout is considered to be a standard "Label" drill and will produce good length with mild backend reaction.
- Place the center of gravity so as to balance Ã?Æ?�Ã?¯Ã?¿Ã?½Ã?Æ?Ã?¯Ã?â??Ã?¿Ã?â??Ã?½Ã?Æ?�Ã?¯Ã?¿Ã?½Ã?Æ?�Ã?â??Ã?½ oz. positive and finger.
- Rotate ball so that the pin (if applicable) is located at 1:30 in relationship to the center of gravity.
- This layout will require no balance hole.
Layout 2 - Leverage Drilling
- This drill pattern is known as a "leverage" drilling. This drilling provides medium length and maximum backend reaction.
- In this layout we place both the pin and center of gravity 3-3/8" from the positive axis point.
- Most often this drill pattern will require a balance hole to remove excess side weight.
- Place the balance hole on the PAP and remove excess side weight down to Ã?Æ?�Ã?¯Ã?¿Ã?½Ã?Æ?Ã?¯Ã?â??Ã?¿Ã?â??Ã?½Ã?Æ?�Ã?¯Ã?¿Ã?½Ã?Æ?�Ã?â??Ã?½ ounce positive.
Layout 3 - Axis Weight Drilling
Note: Be sure to select a ball with less than three ounces of top weight!
- This drilling is referred to as "axis" weight. It provides early roll with a smooth, controllable backend.
- Place the center of gravity on the player's positive axis point.
- Rotate the ball so that the pin is located on the line between the PAP and finger holes.
- Place the balance hole on the PAP and remove excess side weight to less than one ounce, This will ensure the balance of the ball is withing USBC specifications.
Lane #1 Drilling Instructions
- Positive side, finger, & top weight increase length and back-end reaction.
- Negative side, thumb, and bottom weight decrease length and back-end reaction.
- Axis holes decrease flare and back-end reaction.
- Pins closer in and under fingers decrease length.
- Pin-outs 3+" and over the fingers increase the length and flip.
- If ending center of gravity is on your pin, CG or on the same rotational plane as those, reaction is enhanced.